|
|

|

 |
||||
|
Saving in the DDS Format
» Added February 26, 2006 | Written by Lord Of Gifts
What You Will Need:
  Note that the length and width are both powers of two. Your image must also have these dimensions as well, or you cannot save in the DDS format. Save your image. (File -> Save As...) Name your image and select DDS (*.DDS) from the Format: dropdown list. Click Save and you will be taken to the NVIDIA dds format dialog. If you recieve a 'Unsupported input format' error, Flatten the image and try again. (Layer -> Flatten Image) I'll go over what you need to change in this dialog. Save Format: 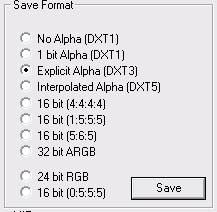 Select Explicit Alpha (DXT 3) if your image uses alpha channels. Otherwise, you want to select No Alpha (DXT 1). MIP maps: 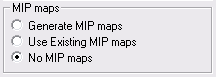 MIP maps aren't neccesary, but I would recommend selecting Generate MIP maps. If you are editing an image that already has MIP maps, select Use Existing MIP maps. If you are creating a decal or icon of some sort, select No MIP maps. Other: 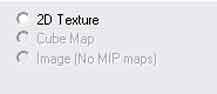 If it isn't already selected be sure that 2D Texture is selected. You can't save if it isn't. Click the save button and thats it. Link To This Tutorial: [tut=7]Saving in the DDS Format[/tut] |
||||||
|
©2005 All Rights Reserved Corey Cantley. Disclaimer |
||||||